Oracle Opscenter Solarislinuxos Requires Valid Ssh Cretentials to Continue
Before You Begin
Purpose
This tutorial describes the process to generate an SSH key pair for Oracle Compute Cloud Service instances.
Time to Complete
30 minutes
Background
When you create your Oracle Compute Cloud Service instance, you must provide an SSH public key that will be used for authentication when you log in to the instance. Generate your SSH key pair and upload the SSH public key to the Oracle Compute Cloud Service before you start to create your instance.
Context
This tutorial is part of the following set of tutorials, which describe how to deploy a PeopleSoft environment to Oracle Compute Cloud Service:
- Generating an SSH Key Pair
- Migrating PeopleSoft Applications to Oracle Compute Cloud Service
- Installing Micro Focus COBOL Compiler and License on an Oracle Compute Cloud Service Instance (optional)
- Compiling PeopleSoft COBOL Programs on an Oracle Compute Cloud Service Instance (optional)
- Performing PeopleTools-Only Upgrade on PeopleSoft Environments Running in Oracle Cloud (optional)
- Performing a PeopleTools Patch Update on a PeopleSoft Environment Running in Oracle Cloud (optional)
- Cloning a PeopleSoft Environment in Oracle Cloud (optional)
- Scaling Existing PeopleSoft Environments on Oracle Cloud (optional)
- Using PeopleSoft Update Images in Oracle Compute Cloud Service
What Do You Need?
A subscription to Oracle Compute Cloud Service is mandatory and you must be a user with the Compute_Operations and Storage Read Write Group roles.
Generating an SSH Key Pair
Generating an SSH Key Pair on UNIX or UNIX-Like Systems Using ssh-keygen
- Run the
ssh-keygencommand.ssh-keygen -b 2048 -t rsa - The command prompts you to enter the path to the file in which you want to save the key. A default path and file name are suggested in parentheses. For example:
/home/user_name/.ssh/id_rsa. To accept the default path and file name, press Enter. Otherwise, enter the required path and file name, and then press Enter. - The command prompts you for a passphrase. Enter a passphrase.
Note that the passphrase isn't displayed when you type it in. Remember the passphrase. If you forget the passphrase, you can't recover it. - When prompted, enter the passphrase again to confirm it.
The command generates an SSH key pair consisting of a public key and a private key, and saves them in the specified path. The file name of the public key is created automatically by appending.pubto the name of the private key file. For example, if the file name of the SSH private key isid_rsa, then the file name of the public key would beid_rsa.pub. - Make a note of the path where you've saved the SSH key pair.
When you create instances, you must provide the SSH public key. When you log in to an instance, you must specify the corresponding SSH private key and enter the passphrase when prompted.
Generating an SSH Key Pair on Windows Using the PuTTY Key Generator
- Find
puttygen.exein the PuTTY folder on your computer and double-click it. - Accept the default key type, SSH-2 RSA, and set the Number of bits in a generated key to 2048, if it is not already set. Then click Generate.

- Move your mouse around the blank area to generate randomness. The SSH key pair is generated.

- Save your private key.
- The key comment is the name of the key. You can keep the generated key comment or create your own.
- Enter a passphrase in the Key passphrase and the Confirm passphrase fields.
Note: Remember the passphrase. You can't recover a passphrase if you forget it.
- To save the private key in the PuTTY PPK format, click Save private key.
Enter the same name as you used for the key comment so that you know which public key to use this private key with. The private key is saved in PuTTY's Private Key (PPK) format, which is a proprietary format that works only with the PuTTY toolset. You can use this key whenever you use PuTTY for SSH.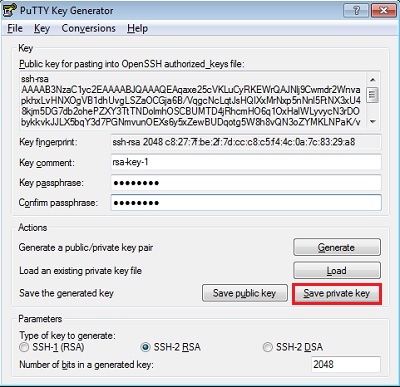
- Next, save your SSH public key.
- To save the public key, in the PuTTY Key Generator, select all of the characters in the Public key for pasting into OpenSSH authorized_keys file: field.
Note: Make sure you select all the characters, not just the ones you can see in the narrow window. If there is a scroll bar next to the characters, you aren't seeing all the characters.
- Right-click somewhere in the selected text and select Copy from the menu.
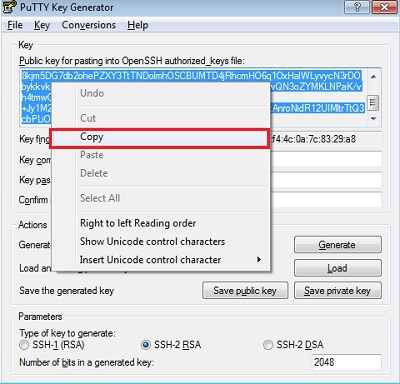
- Open a text editor and paste the characters. Ensure that you paste the text at the first character in the text editor, and don't insert any line breaks.
- Save the key using the same root name that you used for the private key. Add a .pub extension. You can give it any extension you want, but .pub is a useful convention to indicate that this is a public key.
- Exit PuTTY Key Generator.
- To save the public key, in the PuTTY Key Generator, select all of the characters in the Public key for pasting into OpenSSH authorized_keys file: field.
- Make a note of the public and private key names and where they are saved.
When you create instances, you must specify the SSH public key. When you log in to an instance, you must provide the path to the corresponding SSH private key and enter the passphrase when prompted.
Uploading the SSH Key
Want to Learn More?
- How to Begin with Oracle Compute Cloud Service Subscriptions in Using Oracle Compute Cloud Service
- Creating a Single Instance Using the Oracle Compute Cloud Service Web Console
- Oracle Compute Cloud Service Documentation
- Oracle Enterprise Manager Cloud Control Documentation
- PeopleSoft Information Portal
Source: https://www.oracle.com/webfolder/technetwork/tutorials/obe/cloud/compute-iaas/generating_ssh_key/generate_ssh_key.html
0 Response to "Oracle Opscenter Solarislinuxos Requires Valid Ssh Cretentials to Continue"
Post a Comment